
Triple-booting Windows 98, NT 4, and 2000

With my Dell Dimension XPS T450 ready hardware-wise, I needed to get some operating systems installed. My ideal setup is triple-booting Windows 98, NT Workstation 4, and 2000 Professional. This isn’t as straight forward as you’d imagine and it took me more than one total reformat to get it working. This is a tale of many, many failures finally leading to some success.
Start from scratch
To start, I did a low level format of my SCSI hard drive from within the Adaptec SCSI controller BIOS. This took a long time to do a 73 GB drive, but it ensured I was starting from scratch. I had tried re-initialising the disk with fdisk in a Linux live CD, but I ran into some issues with that.
My earlier attempts to get this setup working started with Linux where I partitioned the whole drive to get it ready for Windows installations. But Windows had various problems with this. I assume something wasn’t quite right with what Linux did, or it had set some FAT32 or NTFS attributes that didn’t exist back in the 90s. I don’t know.
Partitioning strategy
There are a few things to keep in mind when considering the partition setup and the order of setup operations needed for booting all of these operating systems:
Windows 98
- Understands FAT16
- Doesn’t understand NTFS at all
- Should be installed on a FAT32 partition to be useful
Windows NT 4
- Understands FAT16
- Doesn’t understand FAT32 at all
- Doesn’t understand NTFS 3.0 (Windows 2000) until Service Pack 4
Windows 2000
- Windows 2000 understands FAT16, FAT32 and NTFS
The common thread here is that all three operating systems understand FAT16. All of the operating systems need a partition to store the key files needed to initiate the system boot process. Some of the key files are:
boot.ini- The list of available operating systems and where to find them on diskbootsect.dos- Windows 98 loaderio.sys- For Windows 98msdos.sys- For Windows 98ntdetect.com- Windows NT and 2000 - detects hardware during boot processntldr- Windows NT and 2000 loader
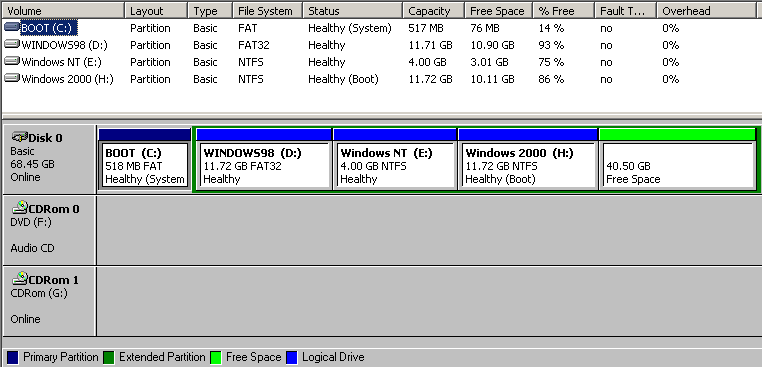
The cleanest way to achieve this will be to make our C: drive a small FAT16 partition. I also like using this partition to store basic drivers like Ethernet to make the setup process easier. So the final partition table:
| Drive | FS | Size | Purpose |
|---|---|---|---|
C: |
FAT16 | 512 MB | Boot/Util |
D: |
FAT32 | 12 GB | Windows 98 |
E: |
NTFS | 4 GB | Windows NT |
F: |
NTFS | 12 GB | Windows 2000 |
Windows 2000 actually assigned itself drive H:, after the CD-RW and DVD drives. Don’t know why, but didn’t want to fight it…
Triple boot partitions
FreeDOS
After the Linux fdisk fails, I tried with the Windows 98 fdisk. I’m using a 73 GB hard drive and fdisk included with Windows 98 doesn’t properly support a drive this large. Every time I started fdisk it reported a different drive size. Also, every time you made any change it would run “checks” on the disk that took absolutely forever.
I tried a different and ultimately more successful route: FreeDOS. I tried the normal version and it failed to boot. Turns out I needed the “Legacy” version.
Here’s what you do in FreeDOS:
- Boot off the CD
- The installer will start, but just quit. It’ll kick you out to a console
- Run
fdisk - Do not select Large disk support. Not selecting it directs
fdiskto create FAT16 partitions - Create a new partition. I did 512MB
- Mark this new partition as active
- Reboot back to FreeDOS
fdisk /v:BOOT /q c:to format the drive and label it as “BOOT”
Now we’re ready to create a couple more partitions:
- Run
fdisk - This time, do enable Large disk support
- I created an extended partition since you are limited to 4 primary partitions on MBR drives
- Create a drive in the extended partition for Windows 98
- Exit
fdisk - Now reboot with your Windows 98 CD in the drive
Sidenote: At this point I actually booted off a Linux Live CD and used
rsyncto copy Ethernet drivers off of my NAS to theC:drive for Windows 98 and NT.
Windows 98 setup
Boot from your Windows 98 CD now. We’ll use its native format for the D: drive. Remember, C: is just for booting. In this example, e: is my CD-ROM drive.
e:
cd win98
format /v:WINDOWS98 d:
mkdir d:\win98
copy *.* d:\win98
I like to copy all the installation files to the disk so I’ll never be asked for the CD again.
cd d:\win98
setup
Important: Windows 98 setup defaults to C:\WINDOWS as the installation directory. This isn’t what we want! Change this to D:\WINDOWS. The rest of setup goes on as usual.
Windows NT 4 Setup
Once Windows 98 is done setting-up you’re ready for Windows NT. Boot off the CD and start the installer.
Even though NTFS supports large partitions, the partition on which you install Windows NT is limited to 4 GB. There’s no way around this. So create a 4 GB NTFS partition.
The rest of installation will continue as usual. When the system reboots you’ll get a boot loader screen that includes “Microsoft Windows” and “Windows NT Workstation 4.00”. The former is the detected Windows 98 installation. You can change the labels later by editing C:\boot.ini.
After installation is complete, you must install at least Service Pack 4 before installing Windows 2000. If you don’t, your NT installation will be unbootable after installing Windows 2000. Windows 2000 uses NTFS 3.0 which Windows NT doesn’t understand until Service Pack 4. Since Windows 2000 replaces the NT-related boot files on C:, an incompatibility arises.
A note about Zip drives
I installed an ATAPI Zip drive in the system since they’re great. However, I found that after service-packing NT, the Zip drive and OS drive letters got swapped. I repeated this twice. This renders the system totally broken since the system drive letter is stored in many places in the registry and configuration files. It’s pretty much unfixable. So to avoid this problem I just kept the Zip drive unplugged until NT was up to date on service packs.
Windows 2000 Setup
You already updated NT4 with service packs, right? Right?! If not, read above before you brick your NT 4 install!
This is the easiest of the lot. You have your choice of file systems (but of course you’ll use NTFS, right?), no partition size limit, and minimal fuss in general. When you’re done you should see a boot screen similar to the one at the top of this page!